Wednesday, March 4, 2020

Kubernetes Cluster in AWS (3 master and 2 worker node)

Setting Up Kubernetes cluster in AWS (with help of kops)


1.Create Ubuntu EC2 instance (befor this create vpc with your range of CIDR and then IAM role Route53, EC2, IAM and S3 full access)

2.install AWSCLI

 curl https://s3.amazonaws.com/aws-cli/awscli-bundle.zip -o awscli-bundle.zip
 apt install unzip python
 unzip awscli-bundle.zip
 #sudo apt-get install unzip - if you dont have unzip in your system
 ./awscli-bundle/install -i /usr/local/aws -b /usr/local/bin/aws


3.Install kubectl

curl -LO https://storage.googleapis.com/kubernetes-release/release/$(curl -s https://storage.googleapis.com/kubernetes-release/release/stable.txt)/bin/linux/amd64/kubectl
 chmod +x ./kubectl
 sudo mv ./kubectl /usr/local/bin/kubectl

4. aws configure  (only give region)

5.Install kops on ubuntu instance:

 curl -LO https://github.com/kubernetes/kops/releases/download/$(curl -s https://api.github.com/repos/kubernetes/kops/releases/latest | grep tag_name | cut -d '"' -f 4)/kops-linux-amd64
 chmod +x kops-linux-amd64
 sudo mv kops-linux-amd64 /usr/local/bin/kops

6.Create a Route53 private hosted zone (you can create Public hosted zone if you have a domain)

7.create an S3 bucket

 aws s3 mb s3://k8sbuckettest

8.Expose environment variable:

export KOPS_STATE_STORE=s3://k8sbuckettest

9.Create sshkeys before creating cluster

 ssh-keygen

/root/.ssh/id_rsa.pub.


10.Create kubernetes cluster definitions on S3 bucket

kops create cluster --cloud=aws --zones=us-east-2c --name=k8s.trojantest.be --dns-zone=trojantest.be --dns public --master-size=t2.micro --master-count=3 --node-size=t2.micro --node-count=2

11.Create kubernetes cluser

  kops update cluster --name k8s.trojantest.be --yes

12. Validate your cluster
    kops validate cluster

13. To list nodes
    kubectl get nodes

angular.yaml:

apiVersion: apps/v1
kind: Deployment
metadata:
  name: angular-deployment
  labels:
    app: angular
spec:
  replicas: 3
  selector:
    matchLabels:
      app: angular
  template:
    metadata:
      labels:
        app: angular
    spec:
      containers:
      - name: angular
        image: sacoefrancis/angular:v4
        ports:
        - containerPort: 80

command to run it:

kubectl create -f angular.yaml


angular-service.yaml:

apiVersion: v1
kind: Service
metadata:
  name: angular-service
spec:
  selector:
    app: angular
  ports:
    - protocol: TCP
      port: 80
      targetPort: 80
  type: LoadBalancer


springboot.yaml:

apiVersion: apps/v1
kind: Deployment
metadata:
  name: springboot-deployment
  labels:
    app: springboot
spec:
  replicas: 2
  selector:
    matchLabels:
      app: springboot
  template:
    metadata:
      labels:
        app: springboot
    spec:
      containers:
      - name: springboot
        image: sacoefrancis/springboot:v4
        ports:
        - containerPort: 8080


springboot-service.yaml:

apiVersion: v1
kind: Service
metadata:
  name: spring-service
spec:
  selector:
    app: springboot
  ports:
    - protocol: TCP
      port: 8080
      targetPort: aa1ef1767cb9646c5bcf367329b21a7a-1651502420.us-east-2.elb.amazonaws.com
  type: LoadBalancer


commands:

ssh -i ~/.ssh/id_rsa admin@api.k8s.trojantest.be


kubectl get pods

kubectl get  namespaces

kubectl get pods --all-namespaces

kubectl create -f nginx.yaml  (running app)

kubectl get pods -o wide

kubectl delete pod nginx-deployment-54f57cf6bf-crvvp


kubectl get pods  (gives only services runing)


kubectl delete deployment nginx-deployment

kubectl delete service loadbalancer

kubectl get svc

kops delete cluster k8s.trojantest.be --yes
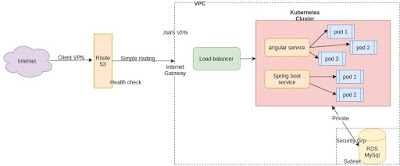
Thursday, December 12, 2019

Extract Data from salesforce objects using python

Extract Data from salesforce  objects  using python:

we are trying to extract salesforce Lead object to csv.


import pandas as pd
from simple_salesforce import Salesforce

sf = Salesforce(
username='enter username',
password='password',
security_token='token from salesforce')

sf_data = sf.query_all("SELECT id, Email, FirstName, LastName, OwnerId ,Company, Address FROM Lead")
sf_df = pd.DataFrame(sf_data['records']).drop(columns='attributes')
print(sf_df['FirstName'])
sf_df.to_csv('sample3.csv', index=False)

Wednesday, January 23, 2019

Configure a Multi-Node Cluster with Cassandra

How-To Configure a Multi-Node Cluster with Cassandra

Introduction:
This article aims at helping you with setting up a multi-node cluster with Cassandra, a highly scalable open source database system that could be used as DB for OTK. In order to do so, first we have to make sure JDK is properly installed, then install Cassandra on each node, and finally configure the cluster.

Background:
Apache Cassandra is a free and open-source distributed database management system designed to handle large amounts of data across many commodity servers, providing high availability with no single point of failure. Cassandra offers robust support for clusters spanning multiple datacenters, with asynchronous masterless replication allowing low latency operations for all clients. Cassandra is used as the non-SQL based datastore for OAuth toolkit on CA API gateway.

Environment:
Cassandra is supported on Mac OS X, and a variety of Linux distributions. Oracle Java VM is highly recommended for Cassandra. I have used CentOS Linux release 7.2.1511 (Core), and Oracle JDK 1.8.0_1-1 in this article.
Instructions:
0- The Cassandra documentation highly recommends the Oracle Java VM 8. Installing the Oracle JAVA VM on single nodes is detailed in TEC1354854.


1- Installing Cassandra on single nodes

Download and extract the package:

$cd /tmp

$wget https://archive.apache.org/dist/cassandra/2.2.8/apache-cassandra-2.2.8-bin.tar.gz


$tar -zxf apache-cassandra-2.2.8-bin.tar.gz


Move it to a proper folder:

$sudo mv apache-cassandra-2.2.8/ /opt/


Next, make sure that the folders Cassandra accesses, such as the log folder, exists and that Cassandra has the right to write on it:

$sudo mkdir /var/lib/cassandra

$sudo mkdir /var/log/cassandra

$sudo chown -R $USER:$GROUP /var/lib/cassandra

$sudo chown -R $USER:$GROUP /var/log/cassandra


To setup Cassandra environment variables, add the following lines to /etc/profile.d/cassandra.sh using vi or cat:


export CASSANDRA_HOME=/opt/apache-cassandra-2.2.8

export PATH=$PATH:$CASSANDRA_HOME/bin


You should now reboot the node, so everything is updated:

$sudo reboot


Log back in and and confirm that everything is set properly:

$sudo sh $CASSANDRA_HOME/bin/cassandra

$sudo sh $CASSANDRA_HOME/bin/cqlsh


2- Setting up Cassandra cluster

Before configuring each node, make sure Cassandra is not running:

$pkill cassandra


You'll also need to clear data:

$sudo rm -rf /var/lib/cassandra/*


As an example, I'll use a 3 node. single data center, single seed Cassandra cluster:

cas1.ca.com

cas2.ca.com

cas3.ca.com


At this point you will calculate token numbers for all cluster nodes. For a single data center with 3 nodes, using the default Murmur3Partitioner:

$python -c 'number_of_tokens=3; print [str(((2**64 / number_of_tokens) * i) - 2**63) for i in range(number_of_tokens)]'

['-9223372036854775808', '-3074457345618258603', '3074457345618258602']


Configuration on nodes is done through customizing cassandra.yaml file:

$vi $CASSANDRA_HOME/conf/cassandra.yaml


The information you'll need to edit either can be the same for all nodes (cluster_name, seed_provider, rpc_address and endpoint_snitch) or different for each one (initial_token, listen_address, broadcast_address and broadcast_rpc_address). Choose a node to be your seed one, and look in the configuration file for the lines that refer to each of these attributes, and modify them to your needs:


cluster_name: 'clusterName'

seed_provider:

- seeds: "seedNode1IP, seedNode2IP, ..."

rpc_address: 0.0.0.0

endpoint_snitch: snitchTopology


Same on all 3 example nodes:

cluster_name: 'Hecuba'

seed_provider:

- seeds: "cas1.ca.com"

rpc_address: 0.0.0.0

endpoint_snitch: SimpleSnitch


For cas1.ca.com:

initial_token: -9223372036854775808

listen_address: localhost

broadcast_rpc_address: localhost


For cas2.ca.com:

initial_token: -3074457345618258603

listen_address: localhost

broadcast_rpc_address: localhost


For cas3.ca.com:

initial_token: 3074457345618258602

listen_address: localhost

broadcast_rpc_address: localhost


Once you have adjusted cassandra.yaml on all the nodes, start cassandra on nodes, doing it on the seed node first:

$sudo sh $CASSANDRA_HOME/bin/cassandra


At this point you have a functional multi-node Cassandra cluster.

Additional Information:
Testing the cluster

Get a description of the cluster:

$$CASSANDRA_HOME/bin/nodetool describecluster


Confirm that all the nodes are up:

$$CASSANDRA_HOME/bin/nodetool status


You should get something like this:


Datacenter: datacenter1

=======================

Status=Up/Down

|/ State=Normal/Leaving/Joining/Moving

--  Address        Load       Tokens  Owns (effective)  Host ID                               Rack

UN  10.151.21.124  278.38 KB  256     100.0%            d194719f-6e81-4d68-a3d0-d3d94c6a056f  rack1

UN  10.151.20.139  193.29 KB  256     100.0%            eabf4e11-35f9-4de2-a3ad-d2de51ebefdf  rack1

UN  10.151.21.137  253.45 KB  256     100.0%            775edae0-db3c-4f16-8bc5-2c41cef8b445  rack1


Create a test keyspace and table on the first node:

$$CASSANDRA_HOME/bin/cqlsh

cqlsh> CREATE KEYSPACE Hector WITH REPLICATION = { 'class' : 'SimpleStrategy', 'replication_factor' : '3' }; 

cqlsh> USE Hector;

cqlsh:Hector> CREATE TABLE planet( catalog int PRIMARY KEY, name text, mass double, density float, albedo float );

cqlsh:Hector> INSERT INTO planet (catalog, name, mass, density, albedo) VALUES ( 3, 'Earth', 5.9722E24, 5.513, 0.367);


Confirm you have the table replicated by running the following command on all nodes:

$$CASSANDRA_HOME:/bin/cqlsh -e "SELECT * FROM Hector.planet;"


 catalog | albedo | density | mass       | name

---------+--------+---------+------------+-------

       3 |  0.367 |   5.513 | 5.9722e+24 | Earth


Notes

Updating the replication factor:

Update a keyspace in the cluster and change its replication strategy options:
ALTER KEYSPACE "Hector" WITH REPLICATION =  { 'class' : 'SimpleStrategy', 'replication_factor' : 2 };

On each affected node, repair the node:
$$CASSANDRA_HOME/bin/nodetool repair

Wait until repair completes on a node, then move to the next node.


Replication factor describes how many copies of your data exist. Consistency level describes the behavior seen by the client. To have one copy on each node, you need a replication factor equal to the number of nodes. Consistency level deals with number of replicas, not number of nodes.


SimpleStrategy is used only for a single datacenter and one rack. SimpleStrategy places the first replica on a node determined by the partitioner. Additional replicas are placed on the next nodes clockwise in the ring without considering topology (rack or datacenter location). NetworkTopologyStrategy is used when you have (or plan to have) your cluster deployed across multiple datacenters. This strategy specifies how many replicas you want in each datacenter.


For writes, with WC=ONE, if the node for the single replica is up and is the one you're connect to, the write will succeed. If it's for the other node, the write will fail.


The way Cassandra deletes data differs from the way a relational database deletes data. A relational database might spend time scanning through data looking for expired data and throwing it away or an administrator might have to partition expired data by month, for example, to clear it out faster. Data in a Cassandra column can have an optional expiration date called TTL (time to live). Use CQL to set the TTL in seconds for data. Cassandra marks TTL data with a tombstone after the requested amount of time has expired. Tombstones exist for a period of time defined by gc_grace_seconds. After data is marked with a tombstone, the data is automatically removed during the normal compaction process.


Facts about deleted data to keep in mind:

Cassandra does not immediately remove data marked for deletion from disk. The deletion occurs during compaction.
If you use the sized-tiered or date-tiered compaction strategy, you can drop data immediately by manually starting the compaction process. Before doing so, understand the documented disadvantages of the process.
A deleted column can reappear if you do not run node repair routinely.


Cassandra processes data at several stages on the write path, starting with the immediate logging of a write and ending in compaction:

Logging data in the commit log
Writing data to the memtable
Flushing data from the memtable
Storing data on disk in SSTables
Compaction


Compaction options are configured at the table level via CQLSH. This allows each table to be optimised based on how it will be used. If a compaction strategy is not specified, SizeTieredCompactionStrategy will be used.


 ALTER TABLE mytable

  WITH compaction =

  { 'class' : 'SizeTieredCompactionStrategy' }


This is the default compaction strategy. This strategy triggers a minor compaction when there are a number of similar sized SSTables on disk as configured by the table subproperty min_threshold. A minor compaction does not involve all the tables in a keyspace. Additional parameters allow STCS to be tuned to increase or decrease the number of compactions it performs and how tombstones are handled.


You can manually start compaction using the nodetool compact command.

Sunday, May 6, 2018

Kafka Installation and basics

installation done from:

https://hevodata.com/blog/how-to-set-up-kafka-on-ubuntu-16-04/

testing installation:
sudo /opt/kafka/bin/kafka-server-start.sh /opt/kafka/config/server.properties


Create Topic in kafka:

/opt/kafka/bin/kafka-topics.sh --create --zookeeper localhost:2181 --replication-factor 1 --partitions 1 --topic test

List topics in kafka:

/opt/kafka/bin/kafka-topics.sh --list --zookeeper localhost:2181

publishing messages in kafka:

/opt/kafka/bin/kafka-console-producer.sh --broker-list localhost:9092 --topic test

helloword!

subscriber:(recieving it)

/opt/kafka/bin/kafka-console-consumer.sh --bootstrap-server localhost:9092 --topic test --from-beginning

helloword!

sudo systemctl enable kafka.service

Saturday, April 28, 2018

Creating Data streaming in Spark from cassandra tables

Cassandra side Changes:

CREATE KEYSPACE vision_app WITH REPLICATION = { 'class' : 'NetworkTopologyStrategy', 'datacenter1' : 2 };

USE vision_app;

CREATE TABLE TEST_CASSANDRA
               (
                id                          int ,
                 SPONSOR_FILE_NO             int,
                 STREET                      varchar,
                 POBOX                       varchar,
                 WORK_PHONE                  varchar,
                 IS_ACCOMPANIED              int,
                PRIMARY KEY ((id))
               );

CREATE TABLE TEST_CAS (id int,address varchar,primary key ((id)))

ALTER KEYSPACE vision_app WITH REPLICATION = { 'class' : 'NetworkTopologyStrategy', 'datacenter1' : 1 };  (altering keyspace aa we have single node)


Spark Side changes:

step:1.Create Sqlcontext (create sqlcontext  which helps to query)

import org.apache.spark.SparkContext
val sc = SparkContext.getOrCreate()      (not needed if we are creating table or temp view in spark)

import org.apache.spark.sql.SQLContext    (not needed if we are creating table or temp view in spark)
val sqlContext = new SQLContext(sc)

step:2 above step is for  reading the cassandra table
val vision_app = spark.read.format("org.apache.spark.sql.cassandra")
.options(Map( "table" -> "test_cas", "keyspace" -> "vision_app"))
.load()

--above step is for  reading the cassandra table

Step:3 load record in spark(table or temp view) from cassandra

:paste
val createDDL = """CREATE  table test_cas
     USING org.apache.spark.sql.cassandra
     OPTIONS (
     table "test_cas",
     keyspace "vision_app",
         pushdown "true")"""
spark.sql(createDDL) // Creates Catalog Entry registering an existing Cassandra Table


:paste
val createDDL = """CREATE  table test_cassandra
     USING org.apache.spark.sql.cassandra
     OPTIONS (
     table "test_cassandra",
     keyspace "vision_app",
         pushdown "true")"""
spark.sql(createDDL) // Creates Catalog Entry registering an existing Cassandra Table

Step 4:Read the data in spark

spark.sql("SELECT * FROM test_cas").show

spark.sql("SELECT * FROM test_cassandra").show


Step5: Joining the two tables

spark.sql("SELECT * FROM test_cassandra ip,test_cas iv where ip.id=iv.id").show

Tuesday, February 20, 2018

Initial Load to Load Data into Kafka by Golden Gate(Big Data)

1.On source server we create the initial data extract process

Log on source server as oracle and go to Oracle Golde Gate directory and start golden gate:
$ ./ggsci
Check out the manager process. If it’s down then start it up:
ggsci > info mgr
ggsci > start mgr

Then we create the process:
ggsci> add extract initext, sourceistable
This is an initial load and the data is extracted once. At this point there are no transactions performed on this table. The data is extracted directly from the table, not from the redo logs.

2.On source server we create a parameter file for the extract process initext.

ggsci > edit params load1
then we add the following parameters:
EXTRACT initext
--SOURCEISTABLE
USERID ggs_admin, PASSWORD ggs_admin
RMTHOST 172.17.0.2, MGRPORT 7809
--RMTTASK REPLICAT, GROUP initrep
RMTFILE /u01/t2, MEGABYTES 100
TABLE scott.test;

Where:
  • extract is the extract process created previously: initext
  • userid/password of the Oracle Golden Gate user on source database: ggs_admin/ggs_admin
  • rmthost/mgrport is the name of the target server/port number 
  • table is the table we created to be processed
Save the parameter file created above.

3. On target server we create the initial load process initrep.

Log on target server tgtdb as oracle and create the process for loading the data:
$ ./ggsci
ggsci > info mgr
if manager is down we start it up.
ggsci > add replicat initrep, exttrail /u01/t2

ggsci > edit params initrep
Then we add the following parameters:
REPLICAT initrep
--SPECIALRUN
--END RUNTIME
TARGETDB LIBFILE /u01/ggadapter/libggjava.so SET property=/u01/ggadapter/dirprm/kafka_init.props
--EXTFILE /u01/t2
REPORTCOUNT EVERY 1 MINUTES, RATE
GROUPTRANSOPS 10000
SOURCEDEFS ./dirsql/SOURCE_DEFGEN.def
MAP scott.test, TARGET myschematopic.test1;

Save the parameter file created above.
Note that on both servers: source and target the parameter files created above reside on folder:
$ <ORACLE_GOLDEN_GATE_HOME>/dirprm
In this case:
$ /db0/oracle/product/12.1.2.1/ogg_1/dirprm

4.Start the extract and loading processes

Log on source server as oracle and run the Oracle Golden Gate interface:
$ ./ggsci
ggsci > start extract initext
Sending START request to MANAGER ...
EXTRACT initext starting
***********************************************************************
* ** Run Time Statistics ** *
***********************************************************************

Report at 2018-02-20 07:34:17 (activity since 2018-02-20 07:34:10)
Output to /u01/t2:
From Table SCOTT.TEST:
# inserts: 1000002
# updates: 0
# deletes: 0
# discards: 0

REDO Log Statistics
Bytes parsed 0
Bytes output 83889477

5.Start the replicat and loading processes.


Log on target server as oracle and run the Oracle Golden Gate interface:
$ ./ggsci
ggsci > start replicat  initrep
GGSCI (5a077cd21ca2) 33> start replicat initrep
Sending START request to MANAGER ...
REPLICAT INITREP starting

GGSCI (5a077cd21ca2) 34> info replicat
ERROR: You must specify a group name.
GGSCI (5a077cd21ca2) 35> info initrep
REPLICAT INITREP Last Started 2018-02-20 08:16 Status RUNNING
Checkpoint Lag 00:42:42 (updated 00:00:00 ago)
Process ID 29424
Log Read Checkpoint File /u01/t2000001
2018-02-20 07:34:16.274206 RBA 32650606

GGSCI (5a077cd21ca2) 36> stats initrep
Sending STATS request to REPLICAT INITREP ...
Start of Statistics at 2018-02-20 08:17:04.
Replicating from SCOTT.TEST to myschematopic.test1:
*** Total statistics since 2018-02-20 08:16:49 ***
Total inserts 643002.00
Total updates 0.00
Total deletes 0.00
Total discards 0.00
Total operations 643002.00
*** Daily statistics since 2018-02-20 08:16:49 ***
Total inserts 643002.00
Total updates 0.00
Total deletes 0.00
Total discards 0.00
Total operations 643002.00
*** Hourly statistics since 2018-02-20 08:16:49 ***
Total inserts 643002.00
Total updates 0.00
Total deletes 0.00
Total discards 0.00
Total operations 643002.00
*** Latest statistics since 2018-02-20 08:16:49 ***
Total inserts 643002.00
Total updates 0.00
Total deletes 0.00
Total discards 0.00
Total operations 643002.00
End of Statistics.


Thursday, November 2, 2017

Oracle GoldenGate for Big Data and Adapter for Kafka

Before installing and running Oracle GoldenGate for Java, you must install Java (JDK or JRE) version 1.8 or later.

Installation of Oracle GoldenGate for Big Data:

  1. Create an installation directory that has no spaces in its name. Then extract the ZIP file into this new installation directory. For example:
    Shell> mkdir installation_directory
    Shell> cp path/to/installation_zip installation_directory
    Shell> cd installation_directory
    Shell> unzip installation_zip
    If you are on Linux or UNIX, run:
    Shell> tar -xf installation_tar
  2. Stay on the installation directory and bring up GGSCI to create the remaining subdirectories in the installation location.
    Shell> ggsci
    GGSCI> CREATE SUBDIRS
  3. Create a Manager parameter file:
    GGSCI> EDIT PARAM MGR
  4. Specify a port for the Manager to listen on by using the editor to add a line to the Manager parameter file. For example:
    PORT 7801
  5. if you are on Windows and running Manager as a service, set the system variable PATH to include jvm.dll, then delete the Manager service and re-add it.
  6. Go to GGSCI, start the Manager, and check to see that it is running:
    GGSCI>START MGR
    GGSCI>INFO MGR
Note:
To check for environmental variable problems locating the JVM at runtime:
Add the parameter GETENV(PATH) for Windows or GETENV(LD_LIBRARY_PATH) for UNIX to the Replicat parameter file.
Start the Replicat process
Check the output for the report using the GGSCI command: SEND REPLICAT group_name REPORT
Having installed OGG for Big Datawe need to setup the Kafka adapter. As for other adapters,
we are copying the configuration files from $OGG_HOME/AdapterExamples/big-data directory
We need to adjust our kafka.props file to define Kafka/Zookeper topics for data and
schema changes (TopicName and SchemaTopicName parameters), and the gg.classpath for Kafka and Avro java classes.
Configuring Oracle GoldenGate to send transactions to the Connect API in Kafka:
Adapter Khafka:
There will be three files important in khafka adapter
1.custom_kafka_producer.properties
2.kafka.props
3.rkafka.prm
Above there files needs to be added in the /u05/ggadapter/dirprm

Kafka Connect settingsEdit the existing /u05/ggadapter/dirprm/custom_kafka_producer.properties
custom_kafka_producer.properties:

custom_kafka_producer.properties
bootstrap.servers=10.152.22.182:9092
acks=1
compression.type=gzip
reconnect.backoff.ms=1000
value.serializer=org.apache.kafka.common.serialization.ByteArraySerializer
key.serializer=org.apache.kafka.common.serialization.ByteArraySerializer
# 100KB per partition
batch.size=1
linger.ms=10000
value.converter=org.apache.kafka.connect.json.JsonConverter
key.converter=org.apache.kafka.connect.json.JsonConverter
internal.value.converter=org.apache.kafka.connect.json.JsonConverter
internal.key.converter=org.apache.kafka.connect.json.JsonConverter

Handler configurationEdit the existing /u05/ggadapter/dirprm/conf.props and amend gg.classpath as shown below.
kafka.props:

Kafka.props
gg.handlerlist=kafkahandler
gg.handler.kafkahandler.type=kafka
gg.handler.kafkahandler.KafkaProducerConfigFile=custom_kafka_producer.properties
#gg.handler.kafkahandler.sourceRecordGeneratorClass=oracle.goldengate.kafkaconnect.DefaultSourceRecordGenerator
gg.handler.kafkahandler.TopicName=elastic_test
gg.handler.kafkahandler.format=json
gg.handler.kafkahandler.SchemaTopicName=mySchemaTopic
gg.handler.kafkahandler.BlockingSend=false
#gg.handler.kafkahandler.includeTokens=false
#gg.handler.kafkahandler.topicPartitioning=table
gg.handler.kafkahandler.mode=tx
#gg.handler.kafkahandler.maxGroupSize =100, 1Mb
#gg.handler.kafkahandler.minGroupSize =50, 500Kb
 
#gg.handler.kafkahandler.format=oracle.goldengate.kafkaconnect.formatter.KafkaConnectFormatter
#gg.handler.kafkahandler.format.insertOpKey=I
#gg.handler.kafkahandler.format.updateOpKey=U
#gg.handler.kafkahandler.format.deleteOpKey=D
#gg.handler.kafkahandler.format.treatAllColumnsAsStrings=false
#gg.handler.kafkahandler.format.iso8601Format=false
#gg.handler.kafkahandler.format.pkUpdateHandling=abend
goldengate.userexit.timestamp=utc
goldengate.userexit.writers=javawriter
javawriter.stats.display=TRUE
javawriter.stats.full=TRUE
auto.create.topics.enable=true
gg.log=log4j
#gg.log.level=DEBUG
gg.log.level=INFO
gg.report.time=30sec
#Sample gg.classpath for Apache Kafka
gg.classpath=dirprm:/u05/ggadapter/kafka/libs/*
#Sample gg.classpath for HDP
#gg.classpath=/etc/kafka/conf:/usr/hdp/current/kafka-broker/libs/*
javawriter.bootoptions=-Xmx512m -Xms32m -Djava.class.path=/u05/ggadapter/ggjava/ggjava.jar


3.Replicat parametersCreate /u05/ggadapter/dirprm/rconf.prm with the following contents:
rkafka.prm:
rkafka.prm
REPLICAT rkafka
-- Trail file for this example is located in "AdapterExamples/trail" directory
-- Command to add REPLICAT
-- add replicat rkafka, exttrail AdapterExamples/u05/extract1/e1
TARGETDB LIBFILE /u05/ggadapter/libggjava.so SET property=/u05/ggadapter/dirprm/kafka.props
REPORTCOUNT EVERY 1 MINUTES, RATE
GROUPTRANSOPS 1000
SOURCEDEFS ./dirsql/SOURCE_DEFGEN.def
--ASSUMETARGETDEFS
MAP vision_app.*, TARGET mySchemaTopic.*;

We have the source as  table  in oracle and our  destination will be different  which we  say as topics in khafka so we need to configure SOURCEDEF file.
Below are steps to create sourcedef file

create SOURCEDEF file using Goldengate DEFGEN utility

Data definitions are needed when the source and target tables have different definitions or the databases are of different types.
Perform below steps on the SOURCE database from which you want to obtain metadata definitions.
From the Oracle GoldenGate directory, run GGSCI.
Defgen
 1.In GGSCI, issue the following command to create a DEFGEN parameter file.
                     ggsci > Edit params defgen
                     defsfile ./dirsql/SOURCE_DEFGEN.def
                     userid gguser password ******
                     TABLE schema.*
 2.Enter the parameters listed above in the order shown and invoke DEFGEN from GG_HOME location 
                   $ ./defgen paramfile ./dirprm/defgen.prm
 3.Specify this copied SOURCE_DEFGEN.def file location in REPLICAT param file(rkafka.prm)
                   ex: SOURCEDEFS ./dirsql/SOURCE_DEFGEN.def
For every DDL change happen to the source tables (only tables which are captured for replication)  generate a NEW sourcedef file and copied to the target server

Testing the Replication:

Connect to Oracle and insert a row, not forgetting to commit the transaction
oracle DML in table(source)
SQL> insert into elastic_test values(2, 'Francis''Francis');
 
1 row created.
 
SQL> insert into elastic_test values (3, 'Ashfak''Ashfak');
 
1 row created.
 
SQL> commit;
 
Commit complete.
 
SQL> update elastic_test set test_name='updatefrancis' where test_id=2;
 
1 row updated.
 
SQL> commit;
 
Commit complete.
 
SQL> delete from elastic_test where test_id=2;
 
1 row deleted.
 
SQL> commit;
 
Commit complete.
 
SQL> update elastic_test set test_id=4 where test_id=3;
 
1 row updated.
 
SQL> commit;
 
Commit complete.
Now if you list the topics defined within Kafka, you should see a new one has been created, for the  elastic_test table:
kafka output (destination)
{"table":"MYSCHEMATOPIC.ELASTIC_TEST","op_type":"I","op_ts":"2017-10-22 11:28:51.000000","current_ts":"2017-10-24T12:50:00.660000","pos":"00000000030000001091","after":{"TEST_ID":1,"TEST_NAME":"Suhail","TEST_NAME_AR":"Suhail"}}
{"table":"MYSCHEMATOPIC.ELASTIC_TEST","op_type":"I","op_ts":"2017-10-24 08:52:01.000000","current_ts":"2017-10-24T12:52:04.960000","pos":"00000000030000001263","after":{"TEST_ID":2,"TEST_NAME":"Francis","TEST_NAME_AR":"Francis"}}{"table":"MYSCHEMATOPIC.ELASTIC_TEST","op_type":"I","op_ts":"2017-10-24 08:52:01.000000","current_ts":"2017-10-24T12:52:04.961000","pos":"00000000030000001437","after":{"TEST_ID":3,"TEST_NAME":"Ashfak","TEST_NAME_AR":"Ashfak"}}
{"table":"MYSCHEMATOPIC.ELASTIC_TEST","op_type":"U","op_ts":"2017-10-24 08:55:04.000000","current_ts":"2017-10-24T12:55:07.252000","pos":"00000000030000001734","before":{"TEST_ID":null,"TEST_NAME":"Francis"},"after":{"TEST_ID":null,"TEST_NAME":"updatefrancis"}}
{"table":"MYSCHEMATOPIC.ELASTIC_TEST","op_type":"D","op_ts":"2017-10-24 08:56:11.000000","current_ts":"2017-10-24T12:56:14.365000","pos":"00000000030000001865","before":{"TEST_ID":2}}
{"table":"MYSCHEMATOPIC.ELASTIC_TEST","op_type":"U","op_ts":"2017-10-24 08:57:43.000000","current_ts":"2017-10-24T12:57:45.817000","pos":"00000000030000002152","before":{"TEST_ID":3},"after":{"TEST_ID":4}}
In case we dont to replicate all colums in the table to destination we can filter that in  replicat param file in source by specifying the column  name
example:
In below example we are transfering only column test_id,test_name not sending test_name_ar to  destination
param_file_source
extract extract1
SETENV (ORACLE_HOME = "/u01/app/oracle/product/11.2.0/dbhome")
SETENV (ORACLE_SID = "vapp3dev")
USERID ggs_admin, PASSWORD ggs_admin
GETUPDATEBEFORES
exttrail /u05/extract1/e1
table vision_app.elastic_test cols (test_id,test_name);